What Equipment Do You Really Need to Start Preserving Food at Home?
You know how every time we talk about stocking up on food, someone throws in those fancy methods of preserve...

You know how every time we talk about stocking up on food, someone throws in those fancy methods of preserve food like freeze-drying or vacuum sealing, and suddenly it feels like we need a whole science lab? Yeah… we have been there too. The good news is that starting with home food preservation does not demand a truckload of equipment. Most of us already have half of what we need sitting in a drawer somewhere.
Before diving in, let us clear the air… preserving food at home is not about being perfect or prepping for a doomsday movie scene. It is really about saving money, reducing waste, and keeping fresh flavors around even when the season is long gone. Plus, there is something oddly satisfying about looking at jars lined up like little trophies.
So what do we actually need?
Well, it depends on which method we want to try first. Let us break it down, nice and simple.
1. Canning
Canning sounds intense, right? Like boiling pots, hissing lids, all that steam. But honestly, most beginners start here because the gear is affordable and surprisingly basic.
Here is what we need:
- A big stock pot… nothing fancy
- Mason jars (the kind with two-piece lids)
- A jar lifter… unless you like fishing boiling glass out with tongs, which we do not recommend
- A funnel for pouring
If we ever want to level up to low-acid foods like green beans or meats, then yes… we would need a pressure canner. But no need to rush. Water bath canning covers jams, salsa, tomatoes, pickles, and tons of fruit spreads.
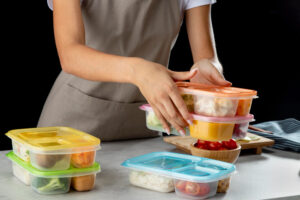
2. Freezing
This one is the most beginner-friendly. We freeze things all the time without even thinking of it as “preservation.” The only tools we really need are:
- Freezer bags or airtight containers
- A marker to label what on earth we put in there
If we want to get fancy, a vacuum sealer does keep food fresher for longer. But it is optional… definitely not something we must buy unless we freeze in huge batches.
3. Dehydrating
Drying food has been around forever. Like… ancient civilizations used sun-drying long before dehydrators existed. A dehydrator just speeds things up.
To start, we can use:
- An oven on low heat
- Baking sheets
- That good old patience
If the bug bites and we enjoy making dried apples or jerky, a countertop dehydrator might be worth it later.
4. Fermenting
This one is fun and weird and magical all at once. Fermentation does most of the work for us… we just set up the environment and let the tiny microbes party.
Beginner tools:
- Glass jars
- Simple lids or fermentation weights
- Salt
- That is honestly it. Sauerkraut, kimchi, pickled veggies… all doable with almost no gear.
5. Storing in a Cool, Dark Place
Root cellaring sounds old school, but many foods store beautifully without any appliances. Potatoes, onions, garlic, squash… they just need the right environment.
What we need:
- Shelving
- Crates or baskets
- A cool space (basement, closet, pantry corner)
Final thoughts
If there is one thing we have learned, it is that preserving food does not require buying half a store. The real magic comes from knowing what gear fits the way we live. We can start with canning or freezing, see what sticks, and slowly add tools when we feel ready. No pressure.
And hey, once we get into the rhythm, we start noticing how much smoother everything feels… from less food waste to easier meal planning. It becomes one of those diy home improvement efficiency hacks that streamlines the whole kitchen without us even trying.